Ryu ga Gotoku Ishin (released in Japan in February 2014) is a spin-off game set at the end of the Edo period of Japanese history (known as the Bakumatsu period), a period when the Tokugawa Shogunate came to an end and imperial rule was restored (Meiji Restoration).
Sakamoto Ryoma is living undercover, with a false identity, as "Saito Hajime" in Kyoto. One year earlier, on the eve of the coup d'état of Tosa, Ryoma's foster father, the man who raised him, was murdered before his eyes. The only lead he had to discover who the killer was is that he used the Tennen Rishin style of fighting. This is a style used by the Shinsengumi, so Ryoma infiltrates their ranks, becoming captain of the 3rd Shinsengumi unit, in attempt to find the killer.
Big thanks to Kevin Debrabandere for creating a PDF for the entire Ishin guide. You can download the PDF version of the guide here. Please be advised that the PDF is outdated now, but still contains information for the whole game.
This guide is for the original (2014) release of Ishin. The information contained within may not necessarily be accurate for the 2023 "Like a Dragon: Ishin" remake.
After completing the "The Woodcutter" substory, speak to the woodcutter in Fushimi and select the top option to play this game. You can also do this in Tosa.
In this mini-game, you simple press Circle when Ryoma is glowing brightly (his hands/arms will be completely white - see picture above) to cut the wood. As you successfully cut wood, Ryoma speeds up enabling you to cut wood much faster. Failing to cut wood (pressing Circle when Ryoma is not glowing) slows it right back down again.
You can cut up to a max of 100 pieces of wood in one go.
You are paid 100 Mon for each piece of wood you cut (becomes 150 mon for each piece after you max out the woodcutter friendship gauge)
Talk to the shop owner at Umaiya Udon Restaurant in Fushimi and select the 2nd option to help him. You next get a menu with 3 choices, with the top 2 choices being difficulty: - Beginner Grade
- Master Grade Select the 3rd option if you don't want to do the mini-game.
This is basically a memory game - as you can see from the above picture, customers place their orders, indicated by the bar at the bottom of the screen and each type of dish has its own button on the controller (as indicated on the screen). Then, after the orders are placed you have a few seconds to memorise all of it and then the screen hides the orders on the bar at the bottom and you have a certain amount of time to input the correct buttons in the correct order.
The hearts at the top left of the screen indicate how many chances you have; if you make 3 mistakes, the mini-game ends.
You can press the L1 button to use the "recommendation" ability, which is Ryoma giving the customers his recommendation. This changes all the orders on the bar at the bottom to one single dish type and also doesn't hide the orders, which is useful! After using it, you can't use it again until you lose a heart.
The amount you've earned is indicated at the top right of the screen.
Underneath that is what "level" you are currently on. As you continue to get orders right, this level increases and it becomes more difficult. This goes up to a maximum of "grand master" level (which is the 10th level). When you get an order wrong, the level decreases. You make more money on the higher levels. Beginner Grade starts you off on the first level, while Master Grade starts you off on the seventh level - which is useful for people who are good at this mini-game and want to make some quick money without going through the lower levels first.
You get 10% of the total earnings at the end of the mini-game.
FISHING
The Circle button casts the line
The Triangle button uses bait
The Square button selects fishing equipment (you can get better fishing equipment via Dharma Exchange)
The X button quits
(Please note that the Circle and X buttons are reversed if you are using a European console - so X casts the line and Circle quits - but the button indicators on the screen still say Circle casts and X quits)
To catch a fish, cast your line (cast it somewhere where there are plenty of fish! You can see silhouettes of the fish in the water), then wait for a fish to go red:
This means the fish is going after the line, then you just need to get the timing right to catch it - Press Circle (X on European consoles) when the red section of the fishing float gets down to the water (doesn't have to be all the way underwater, the bottom of that section just needs to be in water).
On the equipment selection screen, you see 4 bars:
Freshwater Fish Attraction (fish silhouettes are more likely to go red when River Fishing) Oceanwater Fish Attraction (fish silhouettes are more likely to go red when Ocean Fishing) Casting Distance Success Sensitivity (the higher this is, the easier it is to catch fish)
Using bait attracts fish. Keep an eye on the top left corner of the screen because that tells you if your bait is still active - it will flash when it's close to running out. Higher quality bait attracts more fish.
Below are the fish you can catch in river fishing and which river(s) you can get them from. Uji River is in Fushimi and Kamo river is in Mukurogai.
Crucian Carp
Uji River
Kamo River
Koi
Uji River
Kohaku
Uji River
Ghost Koi
Uji River
Electric Catfish
Uji River
Kamo River
Chum Salmon
Uji River
Kamo River
Eel
Kamo River
Rainbow Trout
Uji River
Kamo River
Chinese Turtle
Uji River
Japanese Huchen
Kamo River
Ayu
Kamo River
Crayfish
Uji River
Kamo River
When you do ocean fishing (in Fushimi), you can select the top option for "Rocky Shore Fish Reef" and the 2nd option for "East Sea". Ocean fishing works exactly the same as river fishing.
Below are the fish you can catch in ocean fishing and which ocean(s) you can get them from.
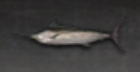
Marlin
East Sea
Tuna
East Sea
Righteye Flounder
East Sea
Red Seabream
Rocky Shore Fish Reef
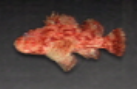
Scorpionfish
Rocky Shore Fish Reef
Threadsail Filefish
Rocky Shore Fish Reef
Conger
East Sea
Gobioidei
Rocky Shore Fish Reef
Great White Shark
East Sea
Giant Oarfish
East Sea
Pufferfish
Rocky Shore Fish Reef
Whitebait
East Sea Rocky Shore Fish Reef
Porcupinefish
Rocky Shore Fish Reef
Squid
Rocky Shore Fish Reef
Japanese Tiger Prawn
Rocky Shore Fish Reef
Octopus
Rocky Shore Fish Reef
Japanese Spider Crab
East Sea
SINGING BAR
Go to the singing bar in Fushimi and talk to the owner at the bar and select the top option to sing. It costs 500 mon for each song you sing.
Next you get a few options. Select the top option to sing, the second option to view the rules, the 3rd option to "reminisce" (watch the clips from the songs you've sung). Select the bottom option to quit.
After selecting the top option, you get a list of songs you can sing.
For most songs you have 2 options - choose the left option (in red text) to select the harder difficulty and choose the right option (in light blue text) to select the easier difficulty. The first song has only one option because it's Ryoma singing, whereas with the other songs Ryoma is supporting the singer. Note that you get less points when you play on the easier difficulty.
For this game, you simply have to press the right buttons at the right time - as indicated on the screen. The better your timing, the more points you get at the end. The maximum score you can get is 100.
When you see this:
It means you have to repeatedly press the button (in this case, repeatedly press triangle).
When you see this:
It means you have to hold down the button (in this case, hold down circle).
The picture of the guys on the top right corner of the screen is basically just a visual indicator for how well you're doing; when they're cheering, you're doing well!
After you perform a song, you talk with the guy at the bar - select the top option to do another song and select the bottom option to quit.
Talk to the man in the Mahjong Parlour in Mukurogai and you get a few options: Choose the top option to register for the "Rising Dragon War" tournament. Choose the second option to exchange Mahjong scoring sticks you earn (by winning) for prizes. Choose the third option to buy Mahjong scoring sticks with your money (at a cost of 1 point per 1 mon).
You can compete for points at one of the 3 tables, with each table having a different difficulty level - the one closest to the entrace is Easy, the one closest to the receptionist guy is Medium and the one furthest away from the entrance is Hard. You need to have at least 25000 scoring sticks to play.
Rising Dragon War
In the "Rising Dragon War" tournament, you compete against many opponents to reach the no.1 spot. You begin from rank 30 and have to keep competiting to get to rank 1. You pay 5 Ryo to register, but after you've paid you can keep participating for free thereafter. You receive prizes when you reach certain ranks (see below). Select the top option to pay and enter the competition. Then select the top option again to participate.
You next get a menu with 4 options: Begin a ranking battle Quit game Mahjong Basic Information (then select top option for rules and second option for scoring combos) View Rankings
Rising Dragon War Prizes
Rank
Prize
1
Solid Gold Figure
3
Platinum Plate
5
Gold Plate
10
Training Daifuku
15
Golden Inro
20
Silver Plate
25
Wooden Bear Carving
POINTS EXCHANGE
Below are the prizes you can get when you exchange Mahjong scoring sticks you earn.
Item
Point Cost
Vulnerary
300
Platinum Plate
150000
Gold Plate
100000
Silver Plate
13000
Copper Plate
1000
Iron Plate
100
DANCING
Go to Nichibu Dance Castle in Rakunai to play this mini-game. Speak with the master and select the top option. It costs 1000 Mon to play.
When you select a song, you have a choice of 4 difficulty levels - Beginner, Average, Advanced and Geisha.
This is basically a rhythm game. Press the correct button when the bar fills up to score points. The circle on the right is for the face buttons (Square, Triangle, Circle, X) and the circle on the left is for directional buttons. When playing on the beginner difficulty, you only have one circle (the face buttons).
Scoring points fills the flower icon at the top right of the screen. When it is full you can press R1 to execute a "Climax Dance Move". After pressing R1 you need to hold down either the left or right analogue stick in the right direction(s) to move the fan from the beginning of the line to the end.
SHOGI
Shogi is basically Japanese chess, so if you're good at western chess you'll be fine with Shogi after learning how the pieces move (and the "promotion system"). If you'd like to learn about Shogi there are many sites on the internet that can teach you. For example this site tells you the basic rules and how pieces move (as well as their promotions), so you can use that to get you started.
Go to the Shogi Parlour in Rakunai to play this mini-game. Speak to the receptionist and you get a few options:
Exchange Shogi Points
Play a Ranking Game
Play a Training Exercise
When you choose to play a ranking game, you get a list of opponents and their ranks. It is ordered from highest rank to lowest rank (so, if you want to compete against the lowest ranking opponent, select the bottom option).
When you start a game, you have a couple of rule selections you can choose before starting. The first is for the rule which allows a player to go back a turn and re-do a move - Have this set to the first option if you want it on and the second option if you want it off. With this option on, you can press square to go back to re-do your previous turn. You can only do this 3 times per game. You can also press L1 to do an enhanced version of this, which allows you to go back as many turns as you like. You can only do this once per game. The second is a time limit - this works like in western chess, where after a turn the player stops the timer and then it resumes when it is their turn again. The time limit is 5 minutes. Personally, I don't recommend having the timer on, because the AI moves instantly (it has no "thinking time"), whereas no human can make a move that quickly (even if you know exactly what move to play right away, you have to select the piece, then select where to move it to which takes a second or two - it's not instant like with the AI).
After starting a game, you flip shogi pieces to decide who goes first - you can think of the pieces as being coins, with "heads" and "tails" - if the majority of them (at least 3/5) land on tails, your opponent goes first. If the majority of them (at least 3/5) land on heads, you go first.
When you do a training exercise, pieces are set up in specific positions and you have to check the enemy king from these starting positions. You unlock more training exercises as you complete them.
POINT EXCHANGE
Item
Point Cost
Vulnerary
30
Platinum Plate
15000
Gold Plate
10000
Silver Plate
1300
Copper Plate
100
Iron Plate
10
GAMBLING
You can visit the gambling den in Rakugai to play any of these mini-games.
When you enter the building, on the left hand side there are 2 guys sat there. You can exchange your points (earned by gambling here) for prizes with the guy on the left. You can purchase points with money from the guy on the right (you need points in order to gamble, so you'll have to buy some from him).
When you speak to the guy to exchange points for prizes, the first option is for items and materials, while the second option is for equipment.
POINT EXCHANGE - ITEMS
Item
Point Cost
Vulnerary
3
Platinum Plate
1500
Gold Plate
1000
Silver Plate
130
Copper Plate
10
Iron Plate
1
Silver Metal Powder
66
Silver Hammer
56
POINT EXCHANGE - WEAPONS
Item
Point Cost
Golden Gun
100000
Magurosetsu
10000
Wooden Gun
10000
POKER
When you play poker, you get many options:
Play Texas Hold 'em
Play Pineapple Hold 'em
Play Omaha Hold 'em
Practice Texas Hold 'em
Practice Pineapple Hold 'em
Practice Omaha Hold 'em
When you choose to play a type of poker, you get a choice of 2 takes (low stakes and high stakes). If after selecting stakes it doesn't let you play, that means you don't have enough points to gamble.
When you choose to practice one of the poker types, it just gives you a tutorial of that style of poker.
KOI-KOI
When you play Koi-Koi, you get a choice of difficulties. At first, you can only do intermediate (top option) and beginner (middle option). Once you start, choose the top option to begin playing.
Koi-Koi is a Japanese card game with the objective of scoring card combinations. Basically, you are drawn a hand and then cards from the deck are placed on the table and you match up cards in your hand with the ones on the table to form a "Yaku" (specific card combinations) and score points (different "Yaku" score different points - you can see how many points different "Yaku" give you by pressing square). This is made nice and simple in Ishin because matching cards are highlighted on the screen (as you can see in the pic above), so even if you've never played Koi-Koi before it should be pretty straightforward. When you pick a card from your hand that doesn't match with any of the ones on the table, you place that card onto the table with the others. After you form a "Yaku", you can choose to keep going (top option) to score more points with more "Yaku", or bank the points you have won (bottom option).
If you want to learn about the game in more detail (such as a full list of "Yaku"), try searching around online for tutorials/lessons.
OICHI-KABU
When you play Oicho-Kabu, you get a choice of difficulties (though you can only pick beginner at first). Once you start, choose the top option to begin playing.
Oicho-Kabu is like Japanese blackjack. Like in blackjack, you compete against the dealer's hand (unless you're the dealer - it rotates between the players - in which case you compete against all the other guys), though instead of aiming for 21 points, you aim for 9. When your hand exceeds 10, the last digit of the total of your cards becomes your number - so, if you have a hand adding up to 17, your hand will count as 7. When the game starts, you select one of the 4 cards on the table as your starting hand. The dealer's hand is at the top left of the screen. If you can't read Japanese number characters, don't worry - the value of your hand (and everyone else's hands) is indicated on the screen.
CEE-LO
Cee-Lo is a dice game played with three 6-sided dice. The banker rolls first after all bets have been placed, then the other players roll. Players roll up to 3 times, until they get a scoring combination. If the player does not roll a scoring combination after 3 rolls, they score nothing. If the banker scores nothing, he automatically loses and the other players get the points.
When a player gets a roll where two of the dice are the same number, the remaining number on the third dice becomes the player's score. So, for example, if a player rolls 5-5-3 the 3 becomes the player's score. If another player rolls 2-2-6, that will give them a score of 6, beating the score of 3. If the banker scores a roll of 1, they automatically lose (other players don't have to roll and get the points in the bank). If the banker scores a roll of 6, he automatically wins.
Special dice rolls:
Triples - If the banker rolls anything from all 2s to all 6s he wins and gets 3x the amount in the bank. Rolling triple 1s gets 5x the amount in the bank.
4-5-6 - If the banker rolls this combo, he wins and 2x the amount in the bank.
1-2-3 - If the banker rolls this combo, he loses and has to pay out 2x the amount in the bank to other players. This is like if he scores a 1, but instead he pays out double.
6-3-4 - This is like getting a score of 6 (like when you roll 2-2-6), but you get 2x the amount in the bank.
Strange Eye - When rolling a 1-3-5 combo, the score becomes the same as the player who rolled before you. When the banker or first "child" (non-banker - first one to roll after banker) rolls this, his score is 3.
Receiving Sound - When rolling a 2-4-6 combo, the score becomes the same as the player who rolls after you. When the banker or 3rd "child" rolls this, his score is 4.
You can press square when it's your turn to roll to take a gamble and have just one throw instead of 3. If the gamble pays off for you and you go on to win the round, you get 3x the amount in the bank.
ODDS AND EVENS
In this game, the dice roller rolls 2 dice in a container and places it in the ground, then the players bet on whether the result (of the 2 dice added up) will be an odd number or even number. Choose the top option to bet Even and 2nd option to bet Odd. After playing a certain number of games, more options appear. You can eventually bet on the exact number of one of the dice (3rd option) and the exact numbers on both of the dice (4th option).
CHICKEN RACING
You can go to the chicken racing building in Rakugai to play this mini-game. Select the top option to play chicken racing and the second option to purchase points (to bet on the races) - these are the same points you use in the Gambling Den, so you can exchange the points you earn at the races here at the gambling den for prizes.
When you chose to play, on the next screen (see above picture), choose the top option to buy a ticket for the race. Choose the second option to watch a race. Choose the third option to have a look at the list of chickens and the bottom option quits out of the races.
When buying a ticket, you can choose the top option to bet on which chicken will come first. You can choose the second option to bet on which 2 chickens will be first and second. You can bet on what place the chickens will finish with the 3rd option (you can bet up to all 5 places). You can place a bet from a list with the 4th option.