KHHsubs
Encounters
Overview
You will encounter enemies while travelling around the various maps in the game world. When you come into contact with them, a battle will begin. These battles have no relation to the main story at all. If you defeat these enemies, you get experience and various rewards. In addition to this, there are also certain training and bounty mission conditions that are linked to the number of encounter battles you have won. As long as you don't get too close to these enemies on the map, you can avoid getting into these fights.
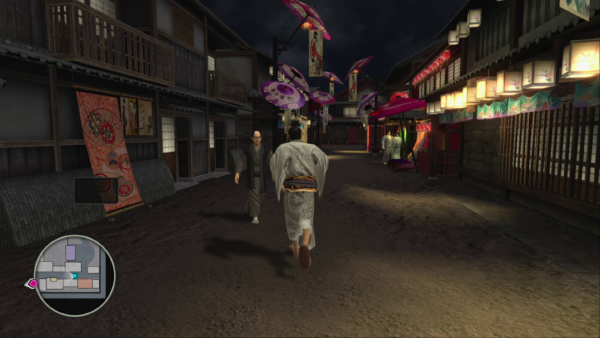
Random encounter enemies will pursue you when they see you. If they get too close to you, a fight will begin.
Encounter Frequency
The places where random encounters spawn are predetermined, but that doesn't mean enemies will appear at all those locations at the same time. Various factors determine how many encounters will appear on the map, such as encounter level (see below) and the equipment Kiryu is wearing. For example, having the Lucky Beads equipped will prevent all random encounters. On the other hand, having the Beautiful Woman Shunga equipped will increase the number of encounter spawns. Kiryu's intoxication level also has an effect on the encounter rate. As you can see, you have a lot of control over the encounter frequency in this game.

The higher Kiryu's intoxication level, the greater the frequency of enemy encounters. If you want to avoid encounters, you'll need to sober up (either by using sobering pills, or by simply waiting for the intoxication level to go down naturally)
Story Progress and Enounter Level
Besides the above details about how to affect encounter frequency, encounter rates are also determined by main story progress. There are 4 encounter levels and the game will change level throughout the story. See below for full details. The higher the encounter level, the tougher the enemies. In addition, the number of enemies in each encounter increases.
As the encounter level increases...
- The enemies get stronger
- The number of enemies in each encounter increases
| Encounter Level | Number of Enemies |
|---|---|
| 1 | 3-4 |
| 2 | 3-5 |
| 3 | 3-5 |
| 4 | 5-8 |
Encounter Level Table
Encounter levels during the main story + number of encounters in each map location
| Story Chapter | Encounter Level | Gion | Mountain Road | Forest Road | Kawara Street | Rakugai | River Road | Farms | Cliff Road |
|---|---|---|---|---|---|---|---|---|---|
| 4-1 | 1 | 0 | 2 | 1 | 0 | 0 | 0 | 0 | 0 |
| 5-1 | 1 | 1 | 2 | 1 | 0 | 2 | 0 | 0 | 0 |
| 5-10 | 1 | 1 | 2 | 1 | 1 | 2 | 0 | 0 | 0 |
| 5-12 | 1 | 1 | 2 | 1 | 2 | 2 | 0 | 0 | 0 |
| 5-13 | 1 | 1 | 2 | 1 | 4 | 2 | 0 | 0 | 0 |
| 5-19 | 2 | 1 | 3 | 1 | 2 | 3 | 0 | 0 | 0 |
| 5-20 | 2 | 2 | 3 | 1 | 2 | 3 | 2 | 0 | 0 |
| 6-2 | 2 | 1 | 3 | 1 | 2 | 1 | 3 | 0 | 0 |
| 6-4 | 2 | 1 | 4 | 1 | 2 | 3 | 3 | 0 | 0 |
| 6-6 | 2 | 2 | 3 | 1 | 2 | 3 | 2 | 0 | 0 |
| 7-2 | 3 | 1 | 3 | 1 | 2 | 3 | 3 | 0 | 0 |
| 7-3 | 2 | 1 | 3 | 1 | 1 | 2 | 3 | 3 | 0 |
| 7-8 | 1 | 0 | 3 | 1 | 2 | 3 | 3 | 0 | 0 |
| 7-17 | 3 | 2 | 3 | 1 | 2 | 3 | 3 | 0 | 0 |
| 8-5 | 3 | 3 | 3 | 1 | 2 | 3 | 3 | 0 | 0 |
| 8-8 | 3 | 2 | 3 | 1 | 2 | 3 | 3 | 0 | 0 |
| 8-12 | 3 | 2 | 3 | 2 | 2 | 2 | 4 | 3 | 3 |
| 9-1 | 3 | 2 | 3 | 2 | 2 | 3 | 3 | 3 | 3 |
| 9-4 | 3 | 2 | 3 | 2 | 2 | 3 | 3 | 3 | 2 |
| 9-7 | 3 | 0 | 0 | 0 | 0 | 0 | 0 | 0 | 0 |
| 9-9 | 3 | 0 | 3 | 2 | 2 | 3 | 3 | 3 | 3 |
| 10-3 | 4 | 0 | 3 | 2 | 1 | 3 | 3 | 3 | 3 |
| 10-7 | 2 | 0 | 3 | 2 | 2 | 3 | 3 | 3 | 3 |
| 10-9 | 3 | 0 | 0 | 0 | 0 | 0 | 0 | 0 | 0 |
| 10-17 | 3 | 2 | 3 | 3 | 2 | 3 | 3 | 3 | 3 |
| 11-1 | 4 | 2 | 3 | 3 | 2 | 3 | 3 | 3 | 3 |
| 11-4 | 4 | 4 | 3 | 3 | 2 | 3 | 3 | 3 | 3 |
| 12-1 | 4 | 2 | 3 | 3 | 2 | 3 | 3 | 3 | 3 |
| 12-3 | 4 | 0 | 3 | 4 | 1 | 1 | 4 | 1 | 2 |
| 12-4 | 4 | 0 | 4 | 2 | 2 | 2 | 1 | 1 | 3 |
| Premium Adventure | 4 | 2 | 3 | 3 | 2 | 2 | 2 | 2 | 3 |
Gold Warriors
When the encounter level is 4, there is a chance that the Golden Warrior enemy type will appear. It's easy to spot them, since they stand out in their gold outfits. They carry valuable items which can be sold for a lot of money. They are unarmed enemy types and have very little health.

The Gold Warriors are easy to spot due to their golden appearance.
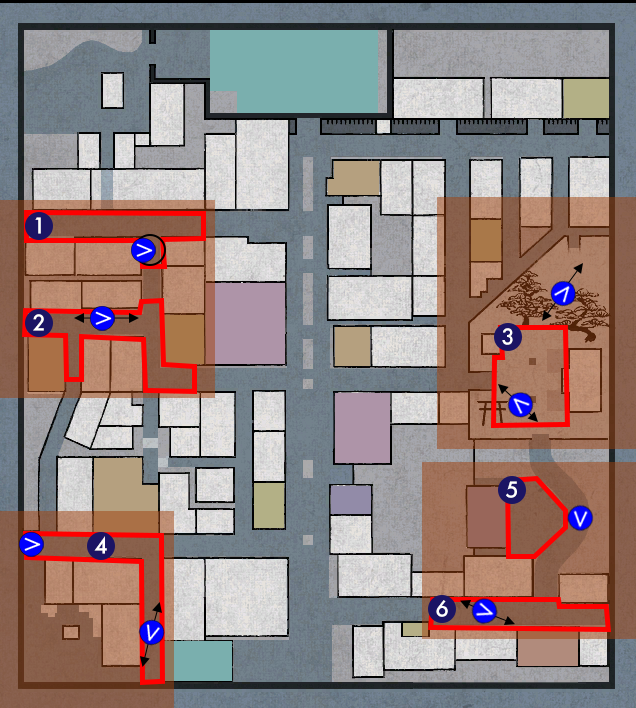
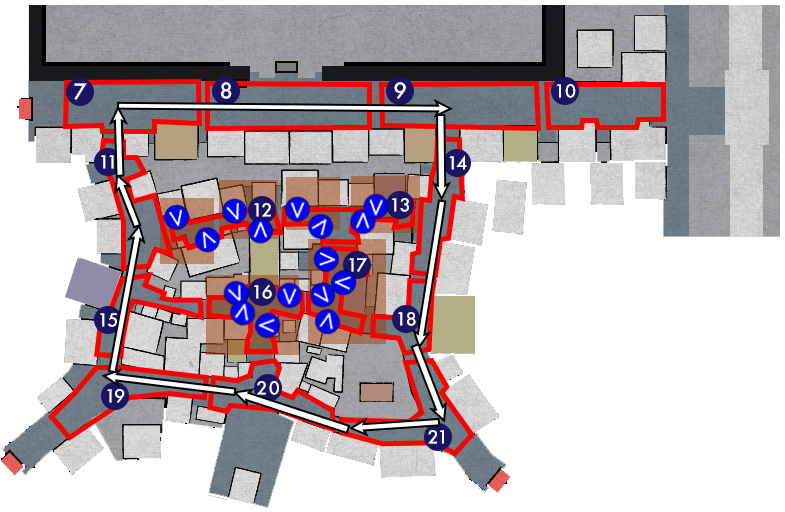
Maps
This section contains maps showing all the possible random encounter spawns in the game. There are a wide variety of locations where enemies could spawn on these maps, however there is one spawn rule that's worth knowing: Only one enemy can spawn at one time within any given Enemy Spawn Section (indicated on the maps with a darker patch). To help understand what this means, consider the Gion map below. Depending on the Encounter Level, Gion could have as many as 4 random encounters. When that happens, all 4 of the Enemy Spawn Sections on the map will have an enemy within. However, the game will never spawn 2 random encounters within a single Enemy Spawn Section. For example, notice there are 2 possible spawn locations at the Gion Inari Shrine. If a random encounter spawns at the northern side of this Enemy Spawn Section, a random encounter will not spawn at the southern side of the same section.
To put it as simply as I can: Darker sections on the map indicate "Enemy Spawn Sections". The game will only ever spawn one random encounter per section, regardless of how many possible spawn locations there are within that section.
In addition, the location at which you bump into the enemy (to trigger the fight) determines the battlefield. The boundaries of these battlefields is indicated on the maps below with red lines. If you're trying to use a specific heat action (e.g. location-specific heat actions), use the maps below along with the battlefields section of this page to help you do that.
Click on a map to open it full-size in a new browser tab.
Map Legend
 |
Enemy Spawn | Shows the possible locations at which enemies spawn. The arrow points towards the direction in which they usually face (particularly true of stationary enemies), though patrolling enemies will change directions. |
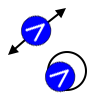 |
Enemy Patrol Route | These lines/arrows show the paths random encounter enemies will walk while on the map. |
 |
Doshin Patrol Route | This shows the route the doshin takes when walking around in Rakugai (after spawning for the first time in Chapter 6) |
 |
Enemy Spawn Section | A predetermined range in which enemies can potentially spawn. The game will only ever spawn one random encounter in any given Enemy Spawn Section. |
 |
Battlefield Range | These lines represent the battlefield on which you will fight enemies when you bump into them on the map. The numbers refer to specific battlefield numbers as detailed on the Battlefields section of this page. |
Gion
Rakugai
Forest Road

Mountain Road
Kawara Street
River Road
Farms
Cliff Road

Rewards
You receive rewards for defeating enemies in random encounters. Besides money, you can also receive recovery items or blacksmith materials. What exactly you can receive will depend on Kiryu's level. This can vary quite a lot, but basically: the higher Kiryu's level, the easier it is to obtain better quality rewards. See the table below for full details.
You always receive rewards after a random encounter battle. The higher Kiryu's level, the better the rewards tend to be.
The reward process
Reward Categories
The rewards are divided into 5 categories. The chance of your reward falling into a particular category is fixed. The blacksmith materials and high-quality items are a lot rarer than things like recovery items.
Kiryu's Level
After the reward category is determined, the possible rewards you receive will be determined by Kiryu's level. This also is divided into 5 groups, with every 10 levels having its own group.
The Reward
After both those steps, finally the reward is determined. The higher Kiryu's level, the greater the chance of receiving high quality rewards.
Encounter Battle Rewards
Battlefields
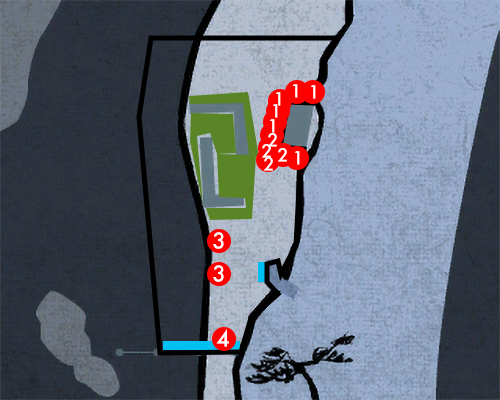
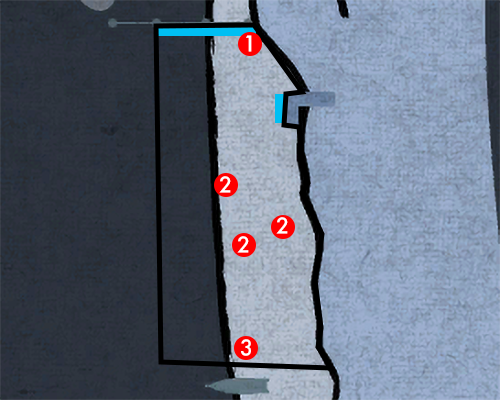
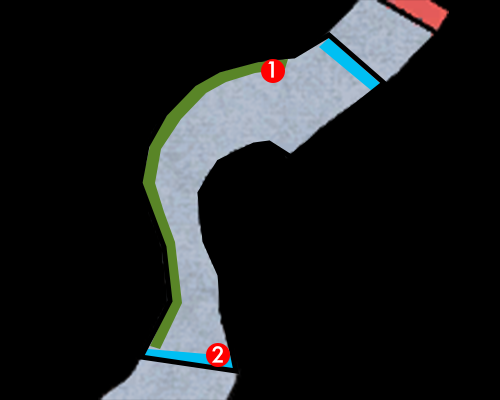
This section contains details for all the random encounter battlefields in the game. Each battlefield below shows the fight area, weapons that can be picked up off the ground, and any special heat actions (e.g. environment-specific heat actions) that can be performed.
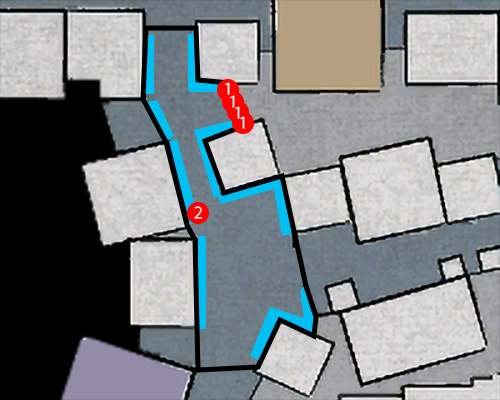
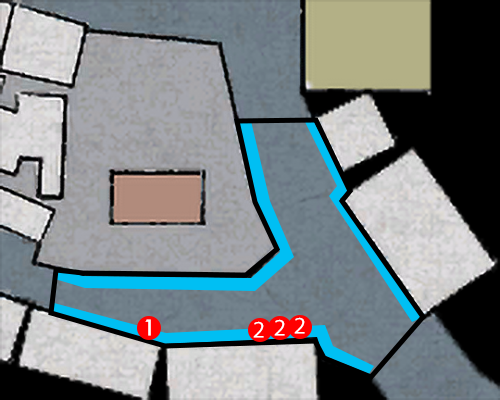
The numbered dots refer to weapons you can pick up. The blue areas show that a common environmental heat action can be performed there (e.g. a wall-related heat action). The green areas are for rare environmental heat actions (e.g. ones can that only be performed at a specific location).
The numbers in the header of each battlefield section below refer to the numbers found on the maps section. The location after the number is the corresponding map where you find the battlefield. The location below the header is the name of the specific area on the map for the battlefield. Below that is the battlefield map. Under that is (if applicable) details concerning weapons you can pick up and special heat actions you can perform.
1
Gion
Kamemachi Alley

1 Bottle
2
Gion
Kamemachi

1 Wooden Box
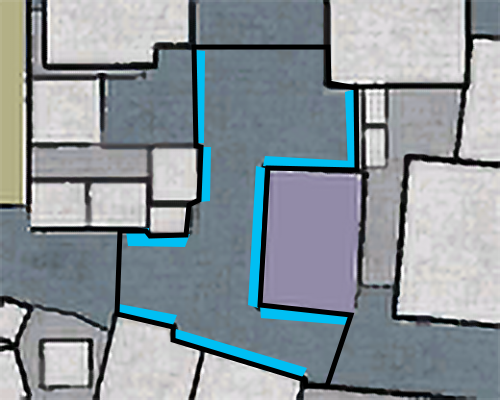
3
Gion
Gion Inari Shrine

1 Branch
Heavy Drop Mastery
4
Gion
Suiten Alley

1 Chair
5
Gion
Inari Lane

6
Gion
Main Gate Alley

Gion Martial Arts - Bowl Crusher
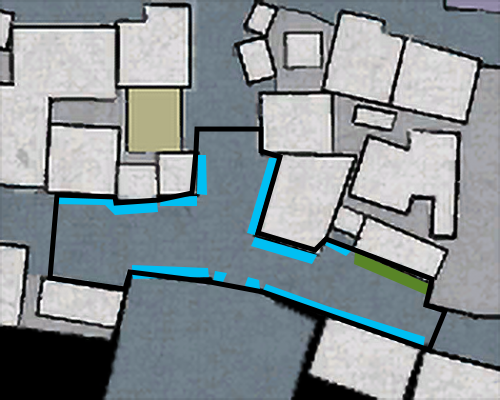
7
Rakugai
Shijo Street (West)

1 Bottle 2 Pot 3 Signboard
8
Rakugai
Shijo Street (Gion Main Gates)

1 Pot 2 Bottle
Gion Martial Arts - Bowl Crusher
9
Rakugai
Shijo Street (East)

1 Pot 2 Red Bucket
10
Rakugai
Shijo Street (Shrine)

1 Medicine Pot 2 Pot 3 Bottle
Gion Martial Arts - Bowl Crusher
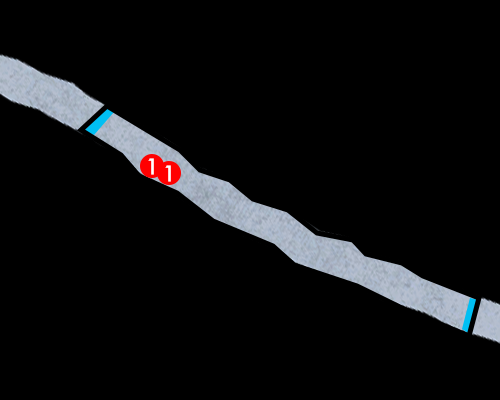
11
Rakugai
Yamato Alley 1
1 Pot 2 Bottle
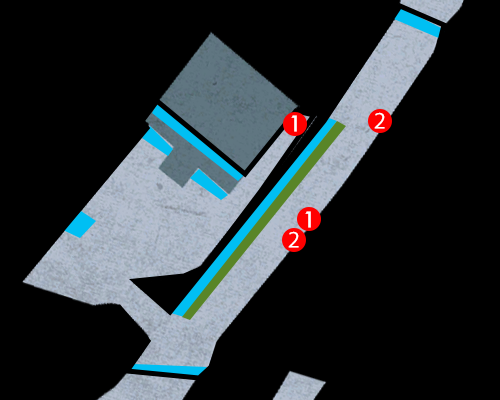
12
Rakugai
Nagaya Street 1

13
Rakugai
Nagaya Street 2

1 Stone 1 2 Stone 2 3 Pot
Gion Martial Arts - Bowl Crusher
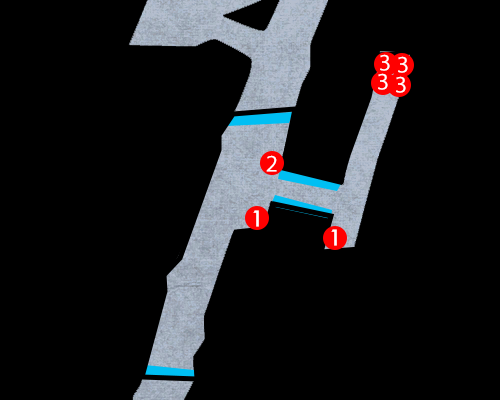
14
Rakugai
Hanami Alley 1

1 Wheel 2 Bottle 3 Tub
Gion Martial Arts - Bowl Crusher
15
Rakugai
Yamato Alley 2

Gion Martial Arts - Bowl Crusher
16
Rakugai
Higashiyama Shopping District

1 Bucket 2 Wooden Box 3 Medicine Pot 4 Pot
Gion Martial Arts - Bowl Crusher
17
Rakugai
Rakugai Shrine
18
Rakugai
Hanami Alley 2

1 Coal Sack
Gion Martial Arts - Bowl Crusher
19
Rakugai
Yamato Alley (South)

1 Pot 2 Bottle 3 Signboard
Gion Martial Arts - Bowl Crusher
20
Rakugai
Ebisu Street
Gion Martial Arts - Bowl Crusher
21
Rakugai
Hanami Alley (South)
1 Tub 2 Pot
22
Forest Road
Forest Road 1

1 Log 2 Wooden Box 3 Hoe
23
Forest Road
Forest Road 2

1 Bamboo Pole
24
Forest Road
Forest Road 3
1 Log
25
Forest Road
Forest Road 4

1 Log
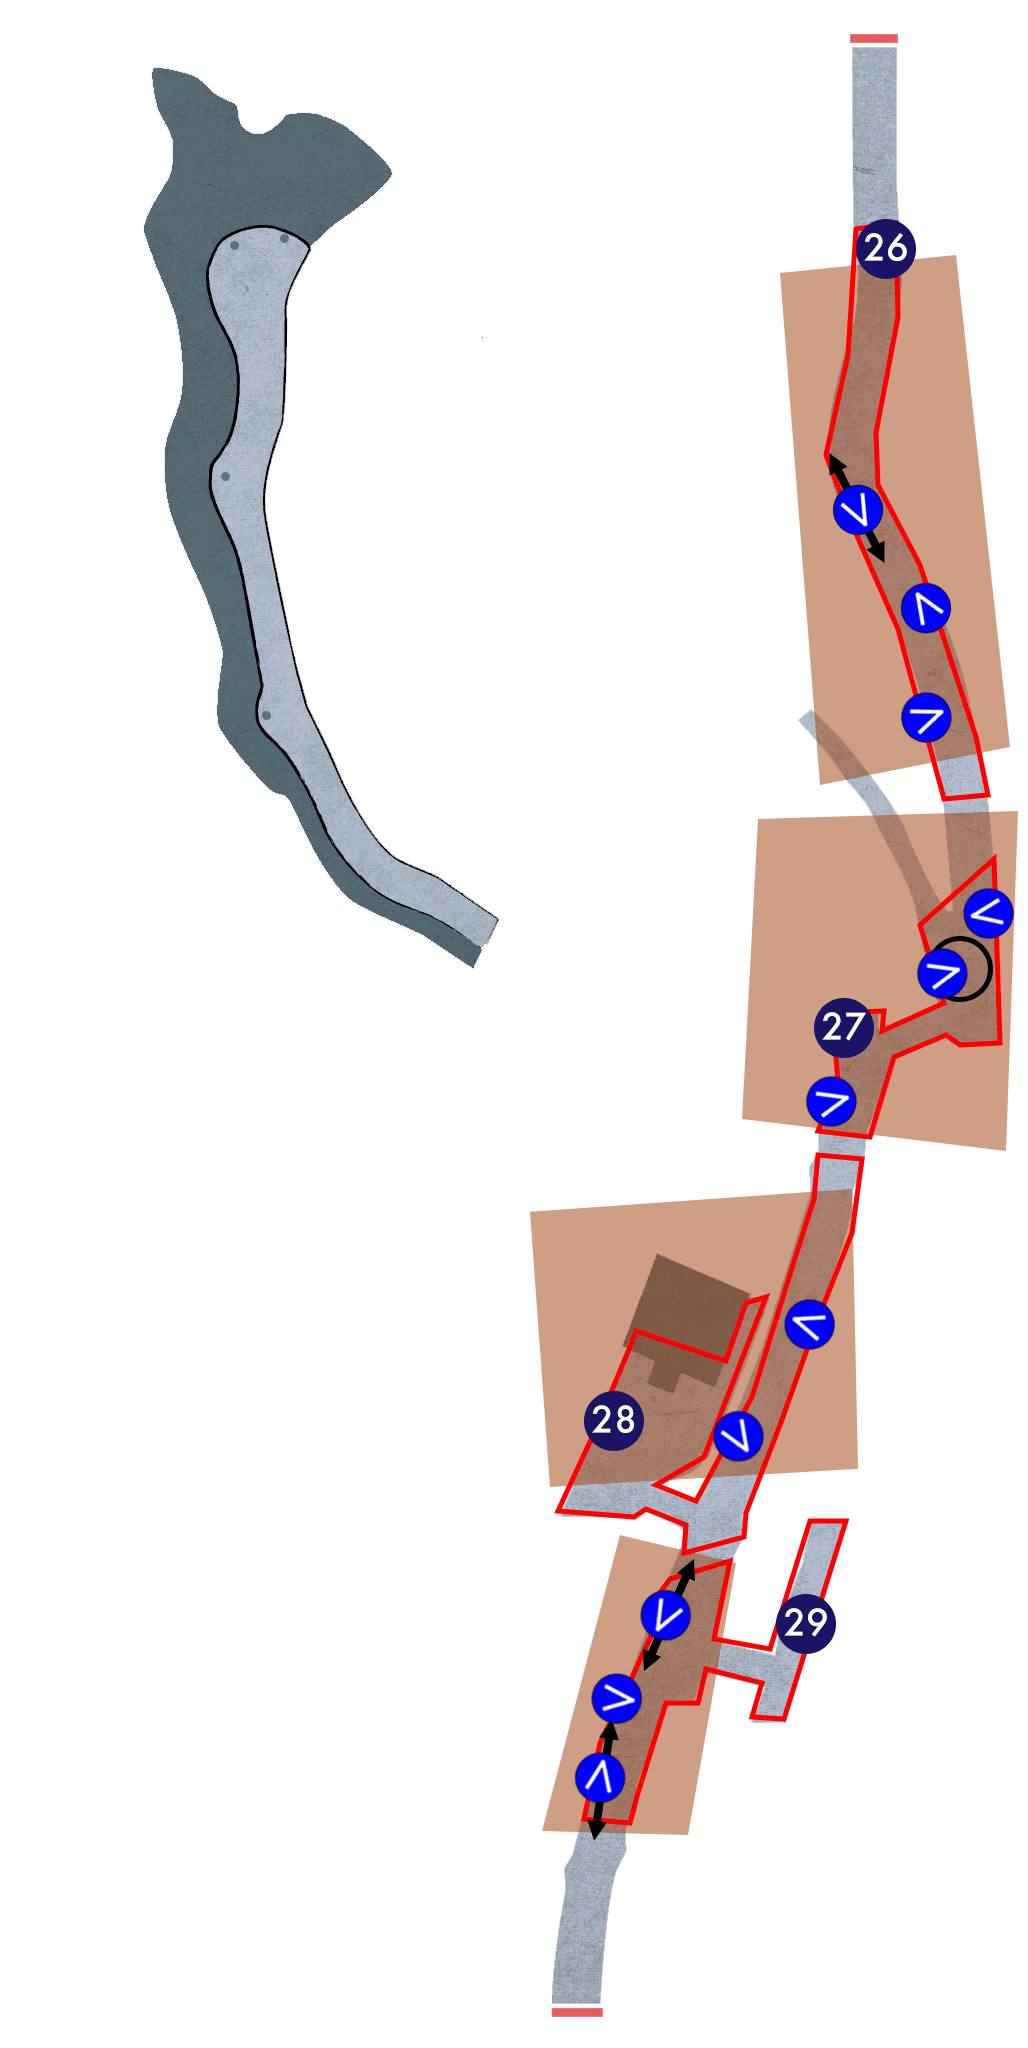
26
Mountain Road
Mountain Road 1

1 Branch 2 Stone
27
Forest Road
Forest Road 2

1 Branch
28
Forest Road
Forest Road 3
1 Branch 2 Stone
Secret Sword - Swallow's Dance
29
Forest Road
Forest Road 4
1 Branch 2 Stone 3 Log
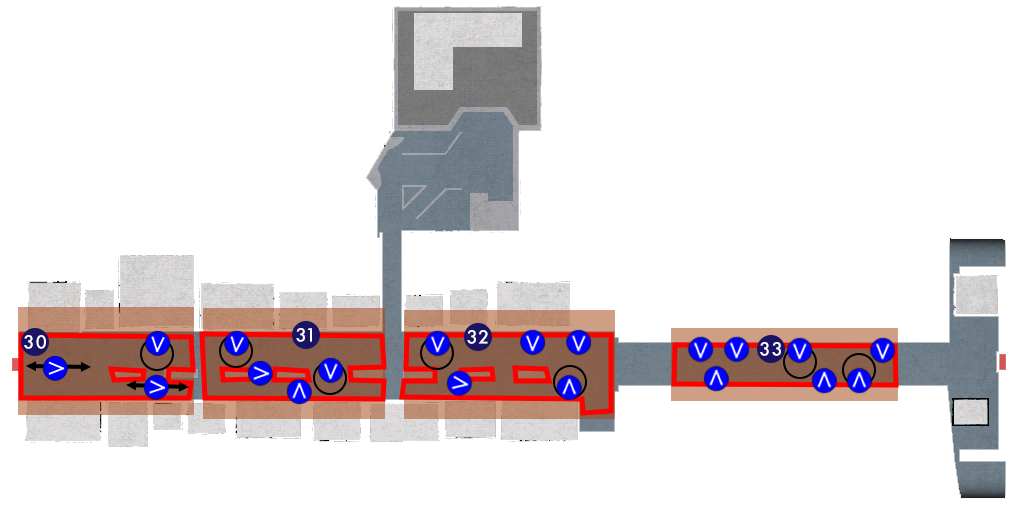
30
Kawara Street
Kawara Street 1

1 White Pot 2 Bamboo Pole 3 Pot 4 Basket 5 Coal Sack 6 Log
31
Kawara Street
Kawara Street 2

1 Bamboo Pole 2 Wooden Box
32
Kawara Street
Kawara Street 3

1 Bamboo Pole 2 Coal Sack 3 Wooden Box 4 White Tub 5 Pot 6 Log
33
Kawara Street
Kawara Street 4

Kamo River Dance
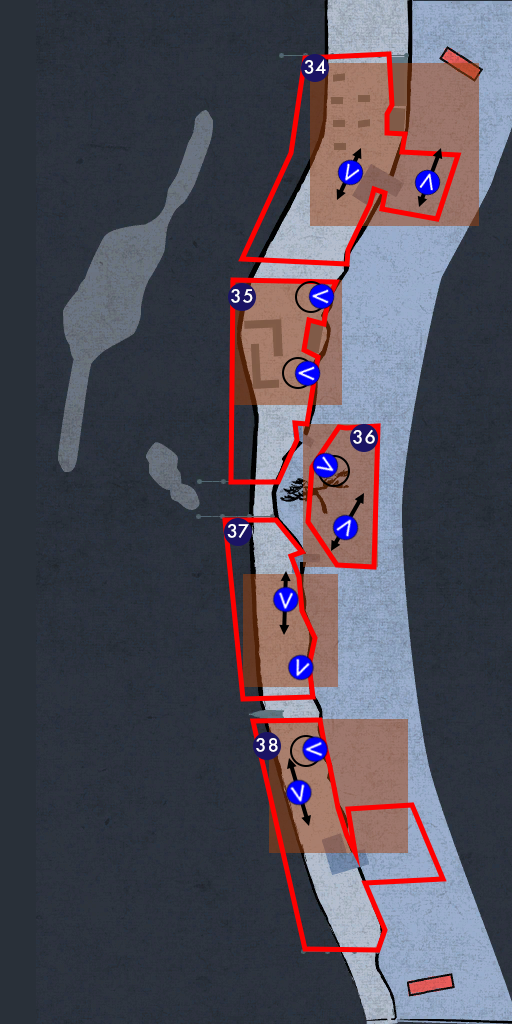
34
River Road
River Road 1

1 Pot 2 Red Tub 3 Branch 4 Driftwood
A Gion Martial Arts - Bowl Crusher B Secret Sword - Swallow's Dance C Stair Mastery
35
River Road
River Road 2
1 Pot 2 Red Tub 3 Driftwood 4 Branch
Gion Martial Arts - Bowl Crusher
36
River Road
River Road 3

1 Branch 2 Notice Board
37
River Road
River Road 4
1 Branch 2 Driftwood 3 Oar
38
River Road
River Road 5

1 Driftwood 2 Branch
A Stair Mastery B Secret Sword - Swallow's Dance
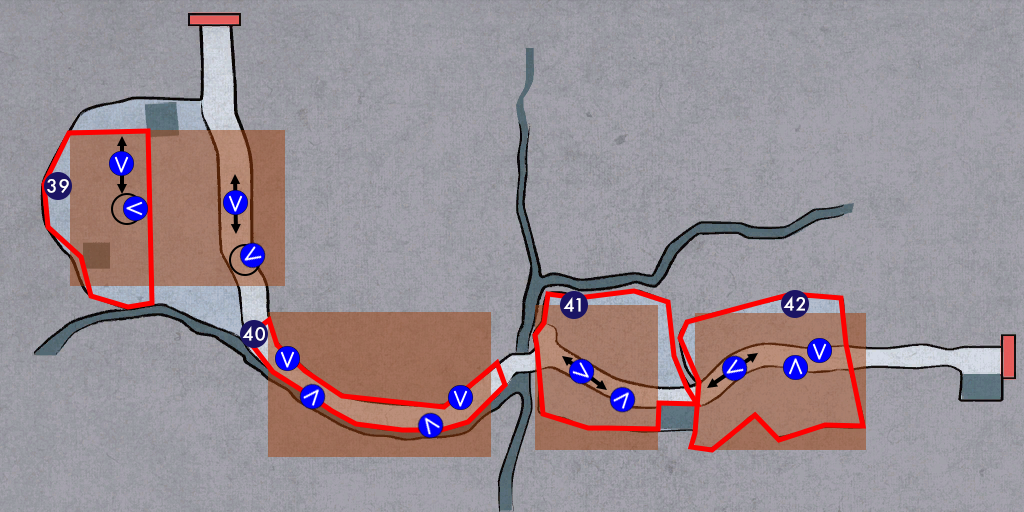
39
Farms
Farms 1

1 Rake 2 Hoe
40
Farms
Farms 2

1 Bamboo Pole 2 Driftwood 3 Branch
41
Farms
Farms 3

1 Driftwood 2 Bamboo Pole 3 Hoe 4 Basket 5 Rake
42
Farms
Farms 4

1 Log 2 Sickle
43
Cliff Road
Cliff Road 1
1 Driftwood 2 Branch
Throwdown Mastery
44
Cliff Road
Cliff Road 2

1 Bamboo Pole 2 Log 3 Driftwood 4 Branch
Throwdown Mastery
45
Cliff Road
Cliff Road 3

1 Driftwood 2 Bamboo Pole
Throwdown Mastery
46
Cliff Road
Cliff Road 4

1 Branch


